When I started looking into installing a Garmin Zumo XT on my 2023 Pan America, I had trouble finding a single thread that captured all of the necessary details. Now that I have completed my install, I thought that I would share a few pics and tips from my install experience.
GPS Mount/Mounting Bar
I know that there are cheaper options out there, but I went with the Touratech mount. I've had great experience with their stuff. It's always well-made and engineered.
The first link is the above gauges mounting bracket. The second link is the TFT anti-theft guard, which looks nice paired with the GPS bracket. The guard is not a necessary for the GPS mount, but it looks the business.
Touratech has a nice YouTube video on the install of these items, but be advised that there are steps out of sequence. You need to watch it all the way through.
Things that Touratech doesn't tell you or show in the video.
![Image]()
![Image]()
![Image]()
The resulting setup looks the business. I managed to put the TFT on straighter than our boys in York, PA. Yes, you're paying a premium for Touratech's stuff. It's not cheap, but again, it's not cheap. It looks nice enough that you'll forget that a mere 10-15 minutes ago, you were so frustrated that you seriously thought about flying to Germany to complain to their engineers.
Mounting the GPS
I went with the Garmin Zumo XT, but what you'll see here basically applies to the Zumo XT2 as well. When I started looking at options, it seemed like everything is priced into the stratosphere. Heck, Touratech charges $200 for their locking Zumo mount. The less expensive options are 3D printed and I quickly realized that sellers were simply selling publicly available designs. Having access to a 3D printer, I looked online and found this mount.

 www.thingiverse.com
This particular mount design prevents the Zumo from being easily disconnected from the bike. I wouldn't leave it parked overnight in a bad part of town, but it's enough of a deterrent for a gas or meal stop.
![Image]()
Powering the GPS
I've come across a lot of different advice on the Internet and on this forum. For me, I decided that the best approach would be to power the GPS using one of the accessory ports already under the seat. These ports power on/off with the bike and don't require any cutting or splicing nonsense.
I picked up this 12V SAE to Male adapter cable online from Gerbing. I had ordered a couple of cheaper ones via Amazon that did NOT FIT. This one works like a champ.

 gerbing.com
![Image]()
The Garmin Zumo power cable doesn't have any connector on the end. I soldered an SAE connector pigtail onto the end of the Garmin cable, using heat shrink tubing to cover up my beautiful soldering work. I know that there are other modern ways to do this, but I am old school. Do check the polarity when you're adding a connector. Some SAE pigtails are wired differently. The polarity of this Amazon pigtail is correct, ie black to black, red to red.
While I have seen it suggested in a couple of places, I strongly recommend not routing it over the tank under the black plastic. The tank does need to be removed for some services and you'll create an annoyance for yourself or the tech dealing with it. I routed the wire under the left side of the tank to the underseat area -- the SAE connector will fit through that space. Note that you need to come up underneath the tank mount/hinge to not interfere with the seat.
![Image]()
![Image]()
I used zip ties to secure the cable and route it cleanly on the fairing frame. Do be thoughtful on your routing on that frame so that it doesn't interfere with the windshield or forks. I ended up using six zip ties to keep it all tidy. With the cable tucked above the existing hoses and harness on that side of the tank, the result is an invisible install -- without removing the tank or setting you up for grief later.
![Image]()
For me the total install time was around 3hrs and the results look pro. With this missing piece of the puzzle, I am ready for some adventuring. I hope that you find the information in this post helpful.
GPS Mount/Mounting Bar
I know that there are cheaper options out there, but I went with the Touratech mount. I've had great experience with their stuff. It's always well-made and engineered.
The first link is the above gauges mounting bracket. The second link is the TFT anti-theft guard, which looks nice paired with the GPS bracket. The guard is not a necessary for the GPS mount, but it looks the business.
Touratech has a nice YouTube video on the install of these items, but be advised that there are steps out of sequence. You need to watch it all the way through.
Things that Touratech doesn't tell you or show in the video.
- The video skips over the spacer setup and just shows you the instruction page instead. It's impossible to photograph. While the finished product is solid, this step is a mess.
- I inserted the smaller diameter spacers first into the TFT and used that to line things up and hold things in place. This is out of order with what the video describes, but it is less frustrating.
- After the smaller spacers are inserted, I fit the larger spacers on each side using the bolt to hold it in place.
- The space that you're working is just slightly too small for adult hands. Using expletives as you're fitting it together helps. Do this work on towels, because hardware will fall out and onto the floor.
- You'll note in the images below, I used a green microfiber towel that kept the windscreen from getting scratched on the inside while I wrestled with this.
- When you do plug back in the display, it will power up and do a self test even with the bike completely off. So, don't freak out.
The resulting setup looks the business. I managed to put the TFT on straighter than our boys in York, PA. Yes, you're paying a premium for Touratech's stuff. It's not cheap, but again, it's not cheap. It looks nice enough that you'll forget that a mere 10-15 minutes ago, you were so frustrated that you seriously thought about flying to Germany to complain to their engineers.
Mounting the GPS
I went with the Garmin Zumo XT, but what you'll see here basically applies to the Zumo XT2 as well. When I started looking at options, it seemed like everything is priced into the stratosphere. Heck, Touratech charges $200 for their locking Zumo mount. The less expensive options are 3D printed and I quickly realized that sellers were simply selling publicly available designs. Having access to a 3D printer, I looked online and found this mount.
Garmin Zumo XT Mount for BMW R 1200 GS by StarTony
This thing is designed to mount your Garmin zumo XT to the BMW 12 mm accessory bar. As a special feature, Garmin's unlocking mechanism is covered and you need to insert your bike key to release the navigation unit. No ultimate theft protection, but perfect for a stop at the gas station.Position...
This particular mount design prevents the Zumo from being easily disconnected from the bike. I wouldn't leave it parked overnight in a bad part of town, but it's enough of a deterrent for a gas or meal stop.
Powering the GPS
I've come across a lot of different advice on the Internet and on this forum. For me, I decided that the best approach would be to power the GPS using one of the accessory ports already under the seat. These ports power on/off with the bike and don't require any cutting or splicing nonsense.
I picked up this 12V SAE to Male adapter cable online from Gerbing. I had ordered a couple of cheaper ones via Amazon that did NOT FIT. This one works like a champ.
Gerbing 12V SAE-to-Male Adapter Cable
Gerbing Male Adapter for 12V items.Provides adaptability for SAE-powered items, like trickle chargers.
gerbing.com
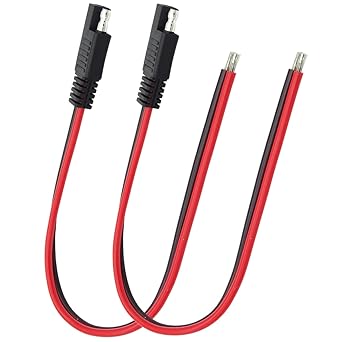
The Garmin Zumo power cable doesn't have any connector on the end. I soldered an SAE connector pigtail onto the end of the Garmin cable, using heat shrink tubing to cover up my beautiful soldering work. I know that there are other modern ways to do this, but I am old school. Do check the polarity when you're adding a connector. Some SAE pigtails are wired differently. The polarity of this Amazon pigtail is correct, ie black to black, red to red.
Amazon.com: XmucTech 14AWG 1 Feet 2 PCS SAE Connector Quick Disconnect Plug Extension Cable, SAE Extension Cable for Automotive, RV, Motorcycle Cars Tractor, Solar Panel Panel SAE Plug (2 PCS) : Automotive
Amazon.com: XmucTech 14AWG 1 Feet 2 PCS SAE Connector Quick Disconnect Plug Extension Cable, SAE Extension Cable for Automotive, RV, Motorcycle Cars Tractor, Solar Panel Panel SAE Plug (2 PCS) : Automotive
www.amazon.com
While I have seen it suggested in a couple of places, I strongly recommend not routing it over the tank under the black plastic. The tank does need to be removed for some services and you'll create an annoyance for yourself or the tech dealing with it. I routed the wire under the left side of the tank to the underseat area -- the SAE connector will fit through that space. Note that you need to come up underneath the tank mount/hinge to not interfere with the seat.
I used zip ties to secure the cable and route it cleanly on the fairing frame. Do be thoughtful on your routing on that frame so that it doesn't interfere with the windshield or forks. I ended up using six zip ties to keep it all tidy. With the cable tucked above the existing hoses and harness on that side of the tank, the result is an invisible install -- without removing the tank or setting you up for grief later.
For me the total install time was around 3hrs and the results look pro. With this missing piece of the puzzle, I am ready for some adventuring. I hope that you find the information in this post helpful.