Harley Davidson Pan America Forum banner
41 - 60 of 82 Posts
I have this kit and the torque adapter. I found that I could not break free the rear wheel nut using the first screen shot. So off to home depot and picked up a collapsible breaker bar that fits easily in the standard Harley side box.
 
Discussion starter · #42 ·
Do not ride your Pan Am with partially applied clutch lever.
Not completelly aplying the clutch lever WILL wear your PanAm clutch baskets, like I did mine.
Even though it seems to work, the clutch assembly will run about 600 bucks plus labor.
I was lucky, that I got mine under warranty.
If you need that kind of clutch technique, I recommend to install of of the many short clutch levers available.
 
Discussion starter · #43 ·
Do not ride your Pan Am with partially applied clutch lever.
Not completelly aplying the clutch lever WILL wear your PanAm clutch baskets, like I did mine.
Even though it seems to work, the clutch assembly will run about 600 bucks plus labor.
I was lucky, that I got mine under warranty.
If you need that kind of clutch technique, I recommend to install of of the many short clutch levers available.
One of the symptoms would be a hard to find neutral and clunky gear shifts.
 
Do not ride your Pan Am with partially applied clutch lever.
Not completelly aplying the clutch lever WILL wear your PanAm clutch baskets, like I did mine.
Even though it seems to work, the clutch assembly will run about 600 bucks plus labor.
I was lucky, that I got mine under warranty.
If you need that kind of clutch technique, I recommend to install of of the many short clutch levers available.
Like riding in the "slip zone" for slow speed maneuvering? I was trained to ride like that. Been doing it for years in parades and obstacle courses. I've done it quite a bit on the PA with no issues after 26k.
How does a short clutch lever help?
How many miles are you at?
 
Discussion starter · #45 ·
Like riding in the "slip zone" for slow speed maneuvering? I was trained to ride like that. Been doing it for years in parades and obstacle courses. I've done it quite a bit on the PA with no issues after 26k.
How does a short clutch lever help?
How many miles are you at?
I got my clutch replaced at 17k.
A short lever will keep you from hitting your 3rd an 4th fingers, if the cable is adjusted properlly.
Some bikes do better than others, my Pan Am, nah.
 
14 and 16mm? Are there two sizes? How long do they have to be, there seems to be limited room, so I want it to be just long enough.
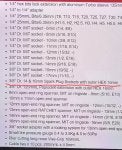
Maybe I misunderstood you, I thought you were asking specifically about the SBV kit and what sockets they provided. I haven't done the spark plugs yet using the kit but everything you need is in the kit. I bascially copied off the kit's list which I will provide the total list here.

Product Specs
  • Weight: 2.5 kg (5.5 lb)
  • Dimension Open: W 49 x H 26.5cm (W 19.29” x H 10.43”)
  • Dimension Rolled up: Ø 10 x H 26.5cm (Ø 3.93” x H 10.43”)
1) Harley-Davidson Pan America Add on Pouch:
  • 3/8" Dr. MIT socket- 22, 24mm
  • 3/8” Dr. Aluminum socket- 32mm, max 200Nm
  • Hex 24mm Dr. Aluminum socket- 36mm, max 200Nm
  • 3/8” Dr. Aluminum Hex axle tool 17-22mm/24-19mm, max 120Nm
  • 3/8" Dr. 72-Tooth Super Light Ratchet
  • 3/8" Dr. Heavy duty magnetic locking 1/4" bits socket
  • 17mm Open end ring spanners, MIT on ring side
  • 600 Den Double-layer Tetoron™ Add on pouch Bag
  • 210 Den water-resistant nylon bag (19 x 38cm) (7.4” x 15”)
2) The Basic Adventure Motorcycle Tool Set:
  • 3-in-1 Multi-tool “T-handle - 1/4" Dr. Hex bit ratchet - 11mm ratchet”
  • 1/4" Hex bit lock “Turbo sleeve” extension with 1/4" to 1/4" adapter
  • 1/4" bits : T8, T10, T15, T20, T25, T27, T30, T40, T45, T50, PH3, Slot5.5
  • 1/4" bits : H1.5, H2, H2.5, H3, H4, H5, H5.5, H6, H7, H8, H10, PH2
  • 1/4" Dr. MIT sockets- 6mm(E8), 8mm(E10),10mm(E12),11mm(E14),12mm
  • 8, 12, 14, 16mm Open end ring spanners, MIT on ring side
  • 10 x 11mm Open end spanner
  • 13mm Open end ratchet spanner with 3/8" locking socket adapter
  • 3/8" Dr. Spark plug sockets- 14 & 16mm
  • 3/8" Dr. MIT sockets- 13, 14, 15, 17mm
  • 3/8" Dr. 125mmL PopLock® extension with outer Hex 16mm
  • Tire gauge “small pen type” 0.4 to 3.5Kg & 5 to 50Psi
  • Plier cutting long nose vise grip 169mmL
  • Cable ties x 10 pcs
  • Socket holder 5 x 1/4" & 4 x 3/8"
  • 600 Den double layer Tetoron pouch Bag with SBV Tools tiger head logo
I wanted to get a nicer tool with a fully adjustable angle, just a good length to reach perfectly.

The official kit I see says, 14mm spark plug wrench.

But I'm not certain what length it is.
 
I wanted to get a nicer tool with a fully adjustable angle, just a good length to reach perfectly.

The official kit I see says, 14mm spark plug wrench.

But I'm not certain what length it is.

I can snap a pic with a tape measure when I get off work are you looking for the length of the socket head itself or with what extensions are included in the kit? Also If you go on website sistermoto.com they have lots of kit photos and links to video of the kits might give you and Idea. Let me know specifically what you want measured I can shoot a photo
 
Discussion starter · #53 ·
Another tip.
Do not forget to check if you need a software update on the PanAm.
The dealer can do it, or it can be done at home, many videos available.
VERY IMPORTANT TO ELIMINATE THOSE PESKY CODE ERRORS IF YOU GOT THEM.
 
For anyone with aluminum side cases tired of needing to use the key to unlock them EVERYTIME. Its pretty easy to leave them in an unlocked position that you can still secure.

All you need to do is unlock as usual.

While it's unlocked with the key still inserted and in the position you turned it to unlock, reach around to the back of the mechanism and hold the bar pretty tight as you turn the key slowly return back to the position you need to turn to take the key out.

Just before you get to the 12 o'clock position, start jiggling and trying to pull out the key while using pressure on the locking bar to prevent it from turning all the way back.

It takes a little finesse but you should be able to remove the key and just swing the locking bar back from behind so you can latch and unlatch your hard bags without a key!
 
Get familiar with how the PanAm works doing your OWN maintenance.
Start reading your owner's manual, if you want to get better, get a PanAm service manual, do the procedures the right way, and be carefull with You Tube advise, some good, but a lot of them are bad.
-
1-First task is follow the instructions on how to get the correct oil reading on the PanAm.
-
2-Chain adjustment is another easy one, you ONLY need a socket whrench for the adjusters, a tape measure, and a 36mm socket to loose the rear axel, aligment can be checked on the adjuster threads on both sides.

Any questions, let me know.
Also, the longer of the two gaps inside the weird little wrench that comes in the three piece "tool kit" is exactly 60mm long, precisely the max level of permissible play in the chain.
 
Do not ride your Pan Am with partially applied clutch lever.
Not completelly aplying the clutch lever WILL wear your PanAm clutch baskets, like I did mine.
Even though it seems to work, the clutch assembly will run about 600 bucks plus labor.
I was lucky, that I got mine under warranty.
If you need that kind of clutch technique, I recommend to install of of the many short clutch levers available.
What situation would require partially applied clutch lever? Something like slipping the clutch on trails for traction? Or something else?
 
Discussion starter · #58 ·
When parking the PanAm for an extended amount of time (2 months or more), use the transport mode (Left turn signal hold + Passing high beam hold together for 10 seconds, turn ignition off while still holding Left TS and Passing High beam together until you see a truck with a bike inside on the instument cluster, done)
It holds the battery well, after 2 months and no trickle charger, the battery shown 11.5dcv and started right away, although I had an emergency power bank start battery, the start was good.
Now I have full confidence on my PanAm.
It keeps the PanAm from searching the key fob, saving battery charge.
Plus one and great point! However, I started doing this this year after I get home I put in transport mode as I dont know when next time I'll ride. (Some times a day others a week or two). Since I took off tender early March time frame it hasn't been on tender but in transport mode and no issues as of last week.
And it's a 21 and original battery! ✌
 
41 - 60 of 82 Posts